A Remote Raspberry in the Pi
Switching on and off a Raspberry Pi can be a pain in the ass quite discomforting, with all the shutdown, waiting and pulling the power cord either directly from the Pi or the wall outlet, given you even have access.
A small expansion board can make your life a lot more comfortable.
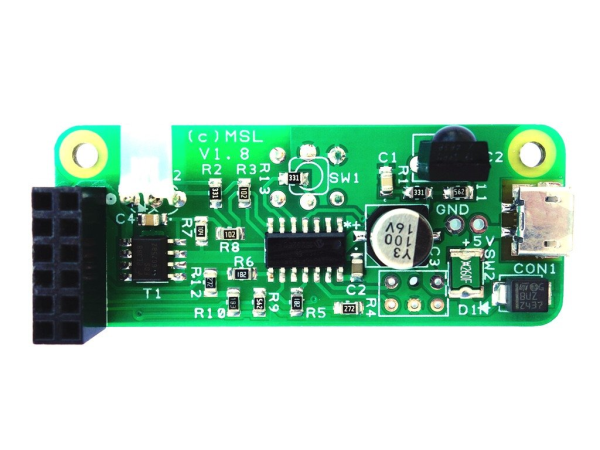
The RemotePi Board by MSL Digital Solutions is an extension board sitting on top of the Raspberry Pi, cleverly occupying only 12 pins of the GPIO header. It sits between the power cord and the Raspberry Pi, thus giving it full control over the power supply - and also providing the possiblity to cut off the Pi completely, reducing the power consumption to a minimum.
The board also "understands" most remote controls, letting you use the remote you possibly already have. It's fully compatible with a standard GPIO IR receiver and even passes through the commands to LIRC (or whatever library you want to use). There are options for all models of the Raspberry Pi (by the time of writing they are still testing the compatibility with the newest Raspberry Pi 3 Model B+; also, they hav a nice compatibility matrix for reference).
Case and mounting

On their site, they also offer a nifty acrylic case (available in transparent and black) fitting all components nicely:
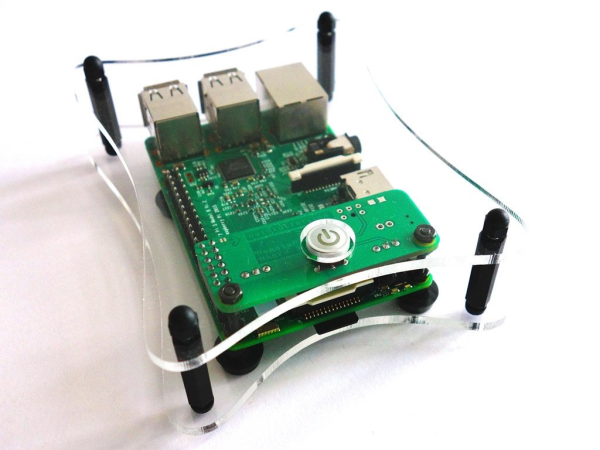
Installing my Raspberry Pi in the case using these helpful instructions took me about 20 minutes. After plugging the power cord into the expansion board, you can start using the board to power on the Raspberry Pi - everything else (learning the power on/off button of your remote, shutting down properly and reacting to a shutdown initiated by the OS) still has to be configured. Again, the vendor offers great instructions on how to go about doing this, which I will summarize and explain here.
Learning the power on/off button(s)
The first step is to teach the RemotePi which button(s) (note the possible plural) you want to use to power on/off your Raspberry Pi. To do so, press the power putton of the RemotePi expansion board until the LED of the board starts to flash red green. Within the next 20 seconds, aim your remote at the infrared receiver and push the button you want to use to power on the Raspberry Pi. A short green flashing of the LED signals that the RemotePi has learned the button. Now, you have another 20 seconds to repeat the procedure for the power off button. You can use the same or a different button, for instance to shut down the Raspberry Pi when you turn off a different remote controlled device. Now you can power on the Pi with a press of the freshly programmed button of just pressing the button on the top of the expansion board.
All of the following content refers to a Raspberry Pi 3 running OSMC. Othe configurations are similar, but differ in some points. Please refer to the manufacturer's instructions for your particular case.
Installing the shutdown scripts
For the RemotePi to work correctly in all situations, there need to be installed two services: one to react to the shutdown signal from the expansion board (caused either by pushing the button on the board or the remote), and another one to react to shutdowns triggered by the OS.
Reacting to the power button
To achieve the first behaviou, create a file in /etc called irswitch.sh (e. g. using nano, type sudo nano /etc/irswitch.sh).The script will react to the shutdown command issued by the expansion board. Put the follwing:
#!/bin/bash
# this is the GPIO pin receiving the shut-down signal
GPIOpin1=14
echo "$GPIOpin1" > /sys/class/gpio/export
echo "in" > /sys/class/gpio/gpio$GPIOpin1/direction
while true; do
  sleep 1
  power=$(cat /sys/class/gpio/gpio$GPIOpin1/value)
  if [ $power != 0 ]; then
    sudo systemctl stop mediacenter
    echo "out" > /sys/class/gpio/gpio$GPIOpin1/direction
    echo "1" > /sys/class/gpio/gpio$GPIOpin1/value
    sleep 3
    sudo shutdown -h now
  fi
done
Save and exit (again in nano, using Ctrl+O and Ctrl+X).
Now, make the script executable, issuing sudo chmod +x /etc/irswitch.sh.
The script has to be registered as a service so it runs at startup, listening for the command to be issued (by reading the input value of GPIO pin 14). If the input value is 1 or "on" (that is, the expansion board signals an imminent power cut), the script stops the mediacenter, puts the pin in an output state (signalling the board that the command has been received by putting it "on") and issuing the shutdown command. Again, remember that this particular script is specific for OSMC (as is stops the service called mediacenter). The service is defined in a file called /etc/systemd/system/irswitch.service (again using nano: sudo nano /etc/systemd/system/irswitch.service) and has the following content:
[Unit]
Description=RemotePi Service
After=systemd-modules-load.service
[Service]
Type=simple
ExecStart=/etc/irswitch.sh
[Install]
WantedBy=multi-user.target
Save and exit (Ctrl+O and Ctrl+X), and again, make the file executable (sudo chmod +x /etc/systemd/system/irswitch.service). As you can see, the service simply calls the script you just created on startup. Now, we just have to activate the script issuing sudo systemctl enable irswitch.service and we can reboot: sudo shutdown –r now. After the restart, the Raspberry Pi should power down when the power button (on the board or on the remote) is pushed.
Reacting to OS shutdown
To react to the OS shutting down on OSMC (e.g. powering off the Raspberry Pi by selecting "Power off" from the OSMC menu), we need another script and another service which calls the script on shutdown as OSMC doesn't support directly calling shutdown scripts. On the plus side, this should also work when shutting down the system via sudo shutdown -h now (e.g. via ssh).
The script resides in a file called /etc/shutdown.sh (sudo nano /etc/shutdown.sh for your convenience):
#!/bin/bash
REBOOT_GREP=$(systemctl list-units --type=target | grep reboot)
SHUTDOWN_GREP=$(systemctl list-units --type=target | grep shutdown)
if [ "$SHUTDOWN_GREP" ] && [ ! "$REBOOT_GREP" ]; then
  # the condition above makes sure, that the shutdown sequence is not run on reboot
  GPIOpin=15
  GPIOpin1=14
  echo "$GPIOpin" > /sys/class/gpio/export
  echo "out" > /sys/class/gpio/gpio$GPIOpin/direction
  echo "1" > /sys/class/gpio/gpio$GPIOpin/value
  sleep 0.125
  echo "0" > /sys/class/gpio/gpio$GPIOpin/value
  sleep 0.2
  echo "1" > /sys/class/gpio/gpio$GPIOpin/value
  sleep 0.4
  echo "0" > /sys/class/gpio/gpio$GPIOpin/value
  echo "$GPIOpin1" > /sys/class/gpio/export
  echo "out" > /sys/class/gpio/gpio$GPIOpin1/direction
  echo "1" > /sys/class/gpio/gpio$GPIOpin1/value
  sleep 4
fi
The script gives a short pulse sequence (1/8 of a second on, 1/5 of a second off, 2/5 of a second on, back to off) to GPIO pin 15 to notify the expansion board of a shutdown and then put the board in a "shutdown received state", putting GPIO pin 14 to on. Note that this won't be issued on a reboot. Save and exit (Ctrl+O and Ctrl+X). Make the file executable (sudo chmod +x /etc/shutdown.sh).
The service description resides in /etc/systemd/system/irswitch2.service (sudo nano /etc/systemd/system/irswitch2.service):
[Unit]
Description=RemotePi Board Shutdown Service
Before=multi-user.target
Conflicts=shutdown.target
[Service]
ExecStart=/bin/true
ExecStop=/etc/shutdown.sh
Type=oneshot
RemainAfterExit=yes
[Install]
WantedBy=multi-user.target
As you can see, it simply calls the script on shutdown. Save and exit (Ctrl+O, Ctrl+X, you know the drill by now). Now activate the service: sudo systemctl enable irswitch2.service. After rebooting the Raspberry Pi once, the RemotePi should automatically power off after a manual shutdown by the OS.
Using a remote in OSMC
The cherry on top is using a remote in OSMC via the expansion board. I ordered the remote from the board's manufacturer's website and basically followed the instructions on the (again excellent) support site for the remote, using their lircd.conf. Works like a charm!
Final words
I'd like to loose some words about the ordering process and shipment. Payments are issued in Euro, that's the only accepted currency. Shipping comes at 4.50 €, payment is done exclusively via PayPal (thus the currency conversion plays almost no role, apart from perhaps being slightly more expensive). As the package ships from Thailand, it might take a while until it arrives, but the guys from MSL shipped it within two days, providing a tracking number. The whole process went very smoothly, the order was packed in an envelope. The expansion board itself came in a small box and everything was protected by bubble wrap.
Now, there are some resellers on the European market, but if there is no hurry it's definitely worth waiting for the shipment from Thailand. And if you keep an eye out for the customs and import tax limits (in Germany, for instance, it's just somewhat under 27 Euros for sums below 5 Euros aren't collected) it might even be less expensive.